My search options just became much more flexible. Instead of looking for something square, I was looking for something that would go into a corner. After a while I found this image:
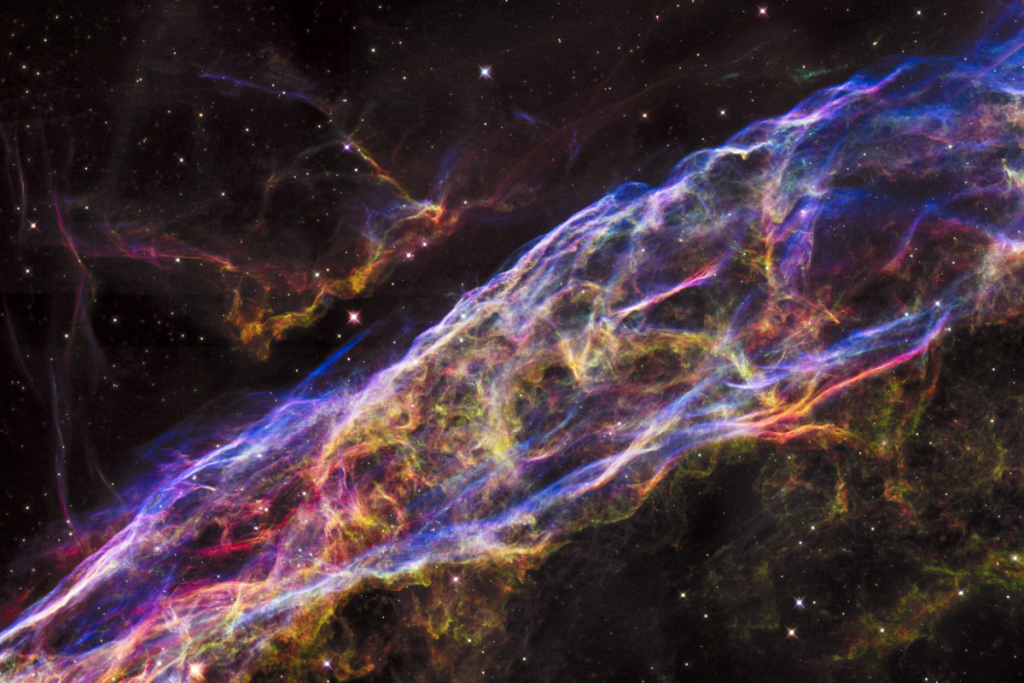
It wasn’t square, so it would not fill up an entire mat design. I decided this was my solution.
First I tried to square-up the image by adding in part of a star field from another image. That didn’t work, because of the edges of the nebula are brownish rather than black. The resolution on the stars was different as well. Argh.
I tried a number of different techniques to try to make the Veil Nebula image blend into my star field image. Nothing worked. Then inspiration struck. In order to make the two images match, I should use the same image twice and make the exact same adjustments. That probably makes no sense, so I’ll explain in more detail about the process.
My graphics program offers the capability of working with layers. Each layer contains different stuff, and there are then ways to merge or blend the layers together. I put my star field on the background layer, and put the Veil Nebula on a secondary layer. I hid the star field while I was working on the nebula image. The first step was to make it square. I sampled the brown shading from the edge of the Veil Nebula and used that as a solid fill to square-up the image. That gave me a consistent tint that would be used over the part of the image that wasn’t covered already.
Then I started a new file, again with the star field as the background layer. I created a secondary layer where the only content was a solid fill with the same brown tint. At this point I have two image files, each with a star field background and each with a secondary layer.
The next step in the process was to make my star field background layer visible. Of course it’s the background, so nothing showed up because it was underneath everything else. By adjusting the opacity (essentially a fancy word for how transparent an image is) down to 52% I reduced the overall color intensity of the nebula (not desirable but acceptable) and allowed the star field to show through. I did the same thing for the solid brown tinted layer on the other file.
At this point one image had a transparent Nebula with brown tint for the empty area over one star field, and the second image was the same star field with just brown tint. The entire point was to make two mats that looked like they went together.
I was incredibly pleased with the results:
 X-Wing Custom Star Field

If you watch the image transition above, you can tell the same star field is used twice. Look at the stars in the upper left corner and you’ll see they remain the same. There are other stars that appear with the nebula; they were part of that secondary image. My challenge was the star field by itself was too black to match up with the Veil, and blending the Veil down to black was beyond my capabilities. With the approach I used I was able to create two play mats that worked the way I wanted. The Veil did lose some brightness due to the opacity setting adjustment, but I felt it was worth the compromise to get two mats that match.
The images shown in the transition above are the digital files. The colors on the mat are slightly brighter and look better than I expected. Dare I say they look stellar? 😆
What about the physical product? Inked Gaming did a fantastic job. I would use them again without reservation. Basic mats (3’x3′ using existing art) are priced very competitively with Fantasy Flight products. The mat material is very close to the same thickness as the Fantasy Flight products and feels robust enough to last for a long time. Supposedly you can throw the mat in a washing machine! I’m a bit scared to try that though. A custom 4’x4′ (48″ square) mat list for $79.99 but anything over $50 ships for free, so there’s that. Plus if you visit their web site a spinner will pop up that gives you a chance to get a discount. I happened to get 10% off my entire order, which was also nice.
To top it all off, the folks at Inked Gaming were fun to deal with. Here’s a few quotes from their emails:
Let me know if you have any other questions. Till then go forth and be awesome to people!
Jim
Sherpa at Inked Gaming
I see you used the Spin to Win Wheel or as I like to call it the Super Happy Happy Joy Joy Spiny Wheel of Fun!
I’m here to make sure you get the Custom Wargaming Mat of your dreams! Or if it’s for someone else, we’ll make sure they are thrilled about their gift and love you forever. 😉
I look forward to helping you with this!
Mitch
Customer Happiness Officer | Inked Gaming
Seriously, where can I get a job as Customer Happiness Officer? 😆
Links to the Inked Gaming website within this post contain an affiliate link.
Thanks for playing BSP. I hope you continue to have as much fun! I always play it with two to three players, can’t even imagine so many!
Stefan, we are so grateful for your efforts in putting this campaign together. And of course to Josh for the Heroes platform that you built on. When we started our first Heroes campaign we had five or six regulars at our game store. People coming by the store saw us playing and bought X-Wing stuff to play with us, so we started a second campaign. For several months we had two simultaneous campaigns running! That took a lot of TIE Fighters. 🙂
For Pallas we decided to try to just put everyone together in one. It has required some adjustments, to be sure, but the missions have been fantastic. Who doesn’t love a good jailbreak and space ship hijacking. 😉